この記事は、ニフティグループ Advent Calendar 2023 15日目の記事です。
はじめに
ニフティ株式会社の島田です。
以前ご紹介したAWS Chatbotの送信内容をカスタムする方法がCustom notificationsとして正式に提供されたため、使ってみました。
ついでにAmazon CloudWatch Logsから特定のワード発生を検知し、slackに通知する仕組みをAWS Lambdaを使わずに実現したので紹介します。
一般的なログ検知
一般的なログ検知、通知の手法として、以下のような構成があると思います。
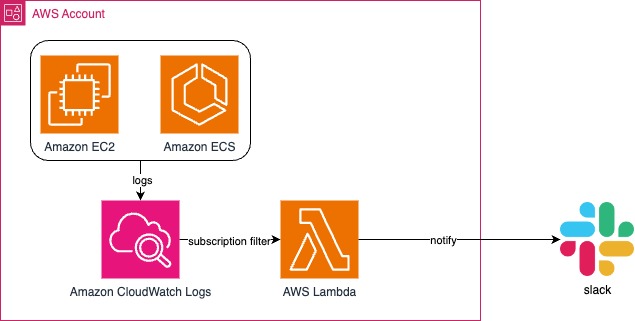
登場するリソースは以下です。
- Amazon EC2 (以降EC2) / Amazon ECS (以降ECS)
- これらはアプリケーションが起動しているコンピューティングを表しています
- Amazon CloudWatch (以降CloudWatch) / Amazon CloudWatch Logs (以降CloudWatch Logs)
- AWS Lambda (以降Lambda)
コンピューティング環境から収集したログをCloudWatch Logsに連携し、サブスクリプションフィルターで検知したログをLambdaに連携、イベントをパースしてslackに連携します。
ノーコードの構成
今回は以下の構成でノーコードを実現しました。

新たに登場するリソースは以下です。
- Amazon Kinesis Data Firehose (以降Kinesis Firehose)
- Amazon S3 (以降S3)
- Amazon EventBridge (以降EventBridge)
- Amazon SNS (以降SNS)
- AWS Chatbot (以降Chatbot)
リソースは増えますが、Lambdaを使わずにslack通知を実現しています。
ちょっとしたハマりポイントもあるので順を追って説明します。
CloudWatch → Kinesis Firehose → S3
まず、対象ログを配置するS3を作成します。
次に、S3をターゲットにしたストリームを作成します。このとき、S3にアクセス可能な権限を付与する必要があります。
最後にCloudWatch Logsの対象のロググループにサブスクリプションフィルターを設定します。
送信先としてKinesis Firehoseを選択し、Kinesis Firehoseへのアクセスを許可します。
これらをTerraform化したサンプルです。
|
1 2 3 4 5 6 7 8 9 10 11 12 13 14 15 16 17 18 19 20 21 22 23 24 25 26 27 28 29 30 31 32 33 34 35 36 37 38 39 40 41 42 43 44 45 46 47 48 49 50 51 52 53 54 55 56 57 58 59 60 61 62 63 64 65 66 67 68 69 70 71 72 73 74 75 76 77 78 79 80 81 82 83 84 85 86 87 88 89 90 91 92 93 94 95 96 97 98 99 100 |
# S3 resource "aws_s3_bucket" "main" { bucket = "logs" } # Firehose resource "aws_kinesis_firehose_delivery_stream" "firehose" { name = "subscriptionfilter-stream" destination = "extended_s3" extended_s3_configuration { role_arn = aws_iam_role.firehose.arn bucket_arn = aws_s3_bucket.main.arn prefix = "subscriptionfilter/" error_output_prefix = "subscriptionfilter/error/" buffering_interval = 60 compression_format = "GZIP" } } resource "aws_iam_role" "firehose" { name = "FirehoseRole" assume_role_policy = jsonencode({ "Version" : "2008-10-17", "Statement" : { "Effect" : "Allow", "Principal" : { "Service" : "firehose.amazonaws.com" }, "Action" : "sts:AssumeRole" } }) } resource "aws_iam_policy" "firehose" { name = "FirehosePolicy" policy = jsonencode({ "Version" : "2012-10-17", "Statement" : [ { "Effect" : "Allow", "Action" : [ "s3:AbortMultipartUpload", "s3:GetBucketLocation", "s3:GetObject", "s3:ListBucket", "s3:ListBucketMultipartUploads", "s3:PutObject" ], "Resource" : [ "${aws_s3_bucket.main.arn}", "${aws_s3_bucket.main.arn}/*" ] } ] }) } resource "aws_iam_role_policy_attachment" "firehose" { role = aws_iam_role.firehose.name policy_arn = aws_iam_policy.firehose.arn } # CloudWatch Logs resource "aws_cloudwatch_log_subscription_filter" "filter" { name = "filter" role_arn = aws_iam_role.filter.arn log_group_name = ${var.log_group_name} filter_pattern = "?ERROR ?Error" destination_arn = aws_kinesis_firehose_delivery_stream.firehose.arn distribution = "Random" } resource "aws_iam_role" "filter" { name = "LogFilterRole" assume_role_policy = jsonencode({ "Version" : "2008-10-17", "Statement" : { "Effect" : "Allow", "Principal" : { "Service" : "logs.ap-northeast-1.amazonaws.com" }, "Action" : "sts:AssumeRole", "Condition" : { "StringLike" : { "aws:SourceArn" : "arn:aws:logs:ap-northeast-1:${var.account_id}:*" } } } }) } resource "aws_iam_policy" "filter" { name = "LogFilterPolicy" policy = jsonencode({ "Version" : "2012-10-17", "Statement" : [ { "Effect" : "Allow", "Action" : ["firehose:PutRecord"], "Resource" : ["${aws_kinesis_firehose_delivery_stream.firehose.arn}"] } ] }) } resource "aws_iam_role_policy_attachment" "filter" { role = aws_iam_role.filter.name policy_arn = aws_iam_policy.filter.arn } |
これでサブスクリプションフィルターの対象のログをS3に保存することができるようになりました。
S3 → EventBridge
作成したS3のイベントをEventBridgeから取得できるようにします。
これをTerraform化したサンプルです。
|
1 2 3 4 5 6 7 8 9 10 11 12 13 14 15 16 17 18 |
# S3 resource "aws_s3_bucket_notification" "main" { bucket = aws_s3_bucket.main.id eventbridge = true } # EventBridge resource "aws_cloudwatch_event_rule" "event" { name = "event" description = "object created event" is_enabled = true event_pattern = jsonencode({ "source" : ["aws.s3"] "detail-type" : [{ "prefix" : "Object Created" }], "detail" : { "bucket" : { "name" : ["${aws_s3_bucket.main.bucket}"] } } }) } |
S3のオプションでcreateイベントを送信することもできるのですが、この後Chatbotにわたす際にイベントを編集したいのでこの方法を使っています。
また、Object Createdイベントは完全一致でなくprefixとして指定する必要があります。
EventBridge → SNS
イベント送信先のSNSトピックを作成します。このとき、SNSのリソースベースポリシーとしてEventBridgeを許可する必要があります。
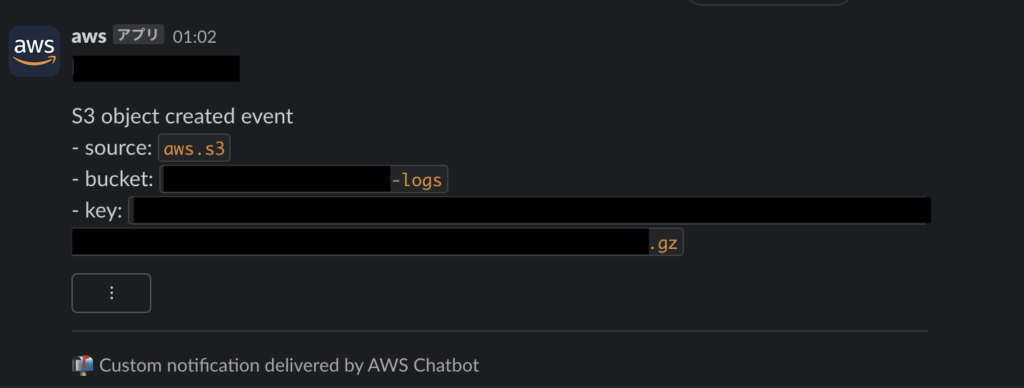
また、EventBridgeで入力を変換し、ChatbotのCustom notificationsの構造を作って送信します。
これらをTerraform化したサンプルです。
|
1 2 3 4 5 6 7 8 9 10 11 12 13 14 15 16 17 18 19 20 21 22 23 24 25 26 27 28 29 30 31 32 33 34 35 36 37 38 39 40 41 42 43 44 45 46 47 48 49 50 51 52 53 54 55 56 57 58 59 60 61 62 63 64 65 66 67 68 69 70 71 72 73 74 75 76 77 78 |
# EventBridge resource "aws_cloudwatch_event_target" "event" { rule = aws_cloudwatch_event_rule.event.name arn = aws_sns_topic.sns.arn input_transformer { input_paths = { source = "$.source", id = "$.id", bucket = "$.detail.bucket.name", key = "$.detail.object.key" } input_template = <<EOF { "version": "1.0", "source": "custom", "id": <id>, "content": { "title": "log detected", "description": "S3 object created event\n - source: `<source>`\n - bucket: `<bucket>`\n - key: `<key>`" } } EOF } } # SNS resource "aws_sns_topic" "sns" { name = "SNS" } resource "aws_sns_topic_policy" "sns" { arn = aws_sns_topic.alert.arn policy = jsonencode({ "Version" : "2008-10-17", "Id" : "__default_policy_ID", "Statement" : [ { "Sid" : "__default_statement_ID", "Effect" : "Allow", "Principal" : { "AWS" : "*" }, "Action" : [ "SNS:GetTopicAttributes", "SNS:SetTopicAttributes", "SNS:AddPermission", "SNS:RemovePermission", "SNS:DeleteTopic", "SNS:Subscribe", "SNS:ListSubscriptionsByTopic", "SNS:Publish" ], "Resource" : "${aws_sns_topic.sns.arn}", "Condition" : { "StringEquals" : { "AWS:SourceOwner" : "${var.account_id}" } } }, { "Sid" : "SNS topic policy from EventBridge", "Effect" : "Allow", "Principal" : { "Service" : "events.amazonaws.com" }, "Action" : [ "SNS:Publish" ], "Resource" : "${aws_sns_topic.sns.arn}", "Condition" : { "StringEquals" : { "aws:SourceAccount" : "${var.account_id}" } } } ] }) } |
リソースベースポリシーはマネジメントコンソールから作成した場合のデフォルトのポリシーを含めています。
SNS → Chatbot
Chatbotが利用するロールを先に作成しておきます。
現時点ではTerraformでChatbotを作成できないため、Chatbot自体はマネジメントコンソールから作成します。
これらをTerraform化したサンプルです。
|
1 2 3 4 5 6 7 8 9 10 11 12 13 14 15 16 17 18 19 20 21 22 23 24 25 26 27 28 29 30 31 32 33 34 35 36 37 38 39 40 |
# Chatbot resource "aws_iam_policy" "chatbot" { name = "ChatbotPolicy" description = "AWS Chatbot policy" policy = jsonencode({ Version = "2012-10-17" Statement = [ { Action = [ "cloudwatch:GetMetricData", "cloudwatch:ListMetrics", "cloudwatch:ListDashboards" ] Effect = "Allow" Resource = "*" }, ] }) } resource "aws_iam_role" "chatbot" { name = "ChatbotRole" assume_role_policy = jsonencode({ "Version" : "2008-10-17", "Statement" : [ { "Sid" : "", "Effect" : "Allow", "Principal" : { "Service" : "chatbot.amazonaws.com" }, "Action" : "sts:AssumeRole" } ] }) } resource "aws_iam_role_policy_attachment" "chatbot" { role = aws_iam_role.chatbot.name policy_arn = aws_iam_policy.chatbot.arn } |
結果
こんな感じで通知が可能になりました。
まとめ
Custom notificationsのおかげで、色々なslack通知がChatbotに任せられるようになりました。
今回の構成はLambdaを使った場合と比べて以下のようなメリット/デメリットが考えられます。
- メリット
- コード、Lambdaの管理をしなくて良い
- ログがS3に保存される
- デメリット
- 通知が来るまで若干時間がかかる
- ログの内容は出力できない
特に今回作った通知ではログの内容を知ることはできないため、広くフィルタを適用する場合などは不向きと考えられます。
それが許容できる場合はLambdaの管理を手放す事ができ、コードを書くことなく実現可能ですので用途に合わせて参考にして頂ければと思います。
明日は、@sonohaさんの記事です。 お楽しみに!
参考記事
- https://aws.amazon.com/jp/about-aws/whats-new/2023/09/custom-notifications-aws-chatbot/
- https://docs.aws.amazon.com/ja_jp/AmazonS3/latest/userguide/ev-mapping-troubleshooting.html
- https://docs.aws.amazon.com/ja_jp/IAM/latest/UserGuide/confused-deputy.html
- https://docs.aws.amazon.com/ja_jp/chatbot/latest/adminguide/custom-notifs.html
- https://docs.aws.amazon.com/ja_jp/AmazonS3/latest/userguide/ev-events.html


